The Ultimate Guide to Creating a Heartwarming Family Photo Gallery Wall
Family photos are precious keepsakes that deserve a special place in your home. A well-designed gallery wall is a beautiful way to showcase your loved ones and add a touch of personality to any room. This guide combines the best tips from several sources to walk you through the process, from gathering your photos to hanging them with pride.
Planning Your Masterpiece
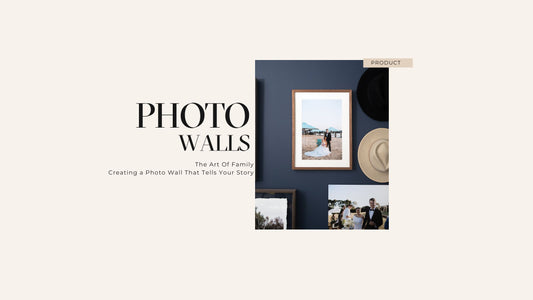
Gather Your Photos:- Start by collecting the photos you want to display. Consider a mix of sizes and orientations (portrait and landscape) for visual interest.
- Think about the overall mood you want to create. Do you want a chronological journey through your family history, or a collection that captures the essence of your family life?
- You can lay out your photos directly on the floor to visualise the overall look and spacing. Use painter's tape to mark the space for each picture.
- An alternative method is to trace each photo on kraft paper, cut out the shapes, and then arrange them on the wall with painter's tape. Mark the location of the hanger on each paper cutout for reference when hanging.
- Choosing a colour palette for your frames or matting can create a cohesive look.
- You can also group photos based on a colour theme, like black and white photos or pictures taken during a specific season.
Choosing Your Frames
- Select frames that complement your photos and your home décor.
- A variety of frame styles and materials can add visual interest, but limit yourself to 2-3 styles initially to avoid a cluttered look.
- Consider incorporating non-framed items like keepsakes or small art pieces to add depth and dimension to your display.
Hanging Your Gallery Wall
Measure and Mark:- Measure your wall space to determine the ideal placement for your gallery wall.
- Mark the placement of each photo or frame on the wall based on your chosen layout, ensuring proper spacing (3-6 inches / 7-15cm) between each piece.
- Begin by hanging your largest artwork or photo first. You can place it in the centre or slightly off-centre for an asymmetrical look.
- Arrange your photos in a way that feels balanced and visually interesting.
- Alternate between horizontal and vertical orientations, and consider creating mini-grids within the larger gallery wall using 2-4 pieces.
Level Up:
- Use a spirit level to ensure all your frames are hanging straight for a polished look.
Personal Touches:
- Don't be afraid to include personal items like drawings, handwritten notes, or other keepsakes that add a touch of sentimentality to your display.
Final Touches
- Take a step back and admire your creation!
- The beauty of a gallery wall is its flexibility. You can easily rearrange photos, add new ones, or swap out frames seasonally to keep your display fresh and ever-evolving.
Bonus Tip: For added security, especially in high-traffic areas like hallways, consider using a small piece of double-sided adhesive tape on the back of each frame to prevent them from moving out of place.
With a little planning and creativity, you can create a stunning family photo gallery wall that will be cherished by you and your loved ones for years to come.